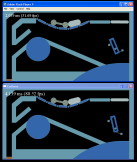
Neko NME updates.

I have had a bit of a think about where some of this cross-platform code should sit, and I’ve partnered with Lee McColl-Sylvester at [DesignRealm](http://www.designrealm.co.uk/html/) to add the functionality to the existing “Neko Media Engine” (NME) project.
This idea here is to provide the flash drawing API to the neko runtime using opengl or software – which ever is fastest at the time.

There have been some big changed to NME recently, and it’s pretty easy for a haxe developer to checkout the “bleeding edge” and have a look at the samples, if they have svn installed. First install the existing NME project using the haxelib tool, ie:


haxelib install nme

Now, at the time of writing, it is 0.2.0, which is now a bit old. To use the new stuff (this works on most haxelib modules), checkout the latest stuff from [code.google.com](http://code.google.com/p/nekonme/). First make a directory – it’s a matter of taste where – to hold the code. For simplicity, I’m using one directory to hold all the google code checkouts, and I’m calling it “C:/code.google/”. From a shell in this directory, follow the instructions on project page about how to checkout the svn version:


svn checkout http://nekonme.googlecode.com/svn/trunk/ nekonme-read-only

(You can actually call the last bit of the directory anything you want). This will give you a whole lot of files, called something like “c:/code.google/nekonme-read-only/nme/Manager.hx” etc. Now you can point your neko at this new code using the haxelib command:


haxelib dev nme c:/code.google/nekonme-read-only

opengl.png

software.png

This should give you access to both the new “.hx” class files, and the new “Windows/nme.ndll” binary file.
Then you can look at the samples by building them with “haxe Compile.hxml”, and running them with “neko *.n”.

There are examples showing the use of sound, a complete game and where things are going with the new flash-drawing api (not yet complete). The images here show circles, lines and text (solid and transparent backgrounds) and 2d-transformations, using both software and opengl rendering (no bilinear-sampling on software version yet).

Announcing Neash

I have renamed the “blink” project to “neash” (_ne_ko fl_ash_) and made a project page for it on code.google.com.

[http://code.google.com/p/neash/](http://code.google.com/p/neash/)

You will need the neko/dlls from the new NeashDemo.zip. This has “blink” renamed to “neash” and I think I’ve fixed a bug in the font stuff that caused a crash on vista.

You could also use the new stand-alone exe (with font fix), and checkout the same demos with the fix too.

neko-nme-static.exe

cardemo.exe

robotdemo.exe

Speaking of stand-alone neko executables, the first half of the tutorial below is already covered the project [“xCross”](http://code.google.com/p/xcross/), which is cross platform,integrated with haxelib and includes regexp. So that is worth knowing about.

Stand-alone Neko

Did you know you can bind a neko “.n” file to the neko exe to create a stand-along exe? Well you can, with the “nekotools.exe boot” command. This simply appends the “.n” file to the standard neko.exe, and adds a small footer, giving you an executable that you can run. This is all well and good, except that you will also need to distribute the “.ndll” files, and place them correctly (usually, next to your exe) so that the dynamic loader can find them. This is also not that hard, but is there is an even simpler, single file solution, with no chance of picking up a wrong or development version. The trick is to build a statically linked version of neko.

To do this, you are going to need to compile the source code yourself. I will be using here Visual Studio 2005, express edition because I am tight and it is free. Start by downloading the source from [nekovm.org](http://nekovm.org/download). Currently, neko is at version 1.6.0.
Unpack it and your will get a directory like “neko-1.6.0”, which has sub-directories like “libs” and “vm” in it. I will call this directory “the neko directory”, NEKO. You will also need the garbage collector, “gc”. You can download it from [hp.com](http://www.hpl.hp.com/personal/Hans_Boehm/gc/). Unpack it, and you will get a directory called something like “gc6.7”. Now this is something I’ll be doing with all the extra packages we will be downloading: rename the directory to have no version number, and move it to somewhere in the NEKO/libs directory. ie “NEKO/libs/gc”.

Now start a new empty visual studio project. Set the location to NEKO, so the path names can be relative. I’ve called mine “neko-static”. Untick the “Create directory for solution” (because I hate this option). Exit visual studio and move the “.sln” and “.vc_proj” files out of the “neko-static” directory that VC created against your will into the NEKO directory. (my second most hated feature of VC). Now remove the neko-static directory, and launch the neko-static.sln file. You can leave it in the default location if you wish – I’m just old and stuck in my ways.

Expand out the neko-static folder and add existing items to the Source Files : all the “.c” files from the vm directory, except “gc.c”. (gc.c is not needed since we are using the gc lib).

At this stage if you try to compile you get a bunch dll linkage errors. To get around this, you need to add the -DNEKO\_SOURCES deines, so right-click the project, set the configuration to “All configs” instead of “Active” (THE FEATURE I HATE THE MOST – one of the reasons I prefer makefiles) and in the c++/Preprocessor/Proprocessor Definitions add “NEKO\_SOURCES”. This says we are building and exporting neko, not importing a dll.

If you compile now, you will get an error in alloc.c finding gc/gc.h, because it is in the “include” directory, not the base. I think the easiest way to fix this is to edit alloc.c to #include “libs/gc/include/gc.h”.

Now you get a bunch of “\_\_imp\_\_GC\_ …” undefines. This tells me that we are using the dynamic import version for gc, so also change the #define of “GC\_DLL” to “GC\_NOT\_DLL” in vm/alloc.c. Now we get the static versions undefined, which is what we want – fix this by creating a sub-folder in the project “Source Files” called “gc” and add the files:
allchblk.c alloc.c blacklst.c checksums.c dbg\_mlc.c dyn\_load.c finalize.c headers.c mach\_dep.c malloc.c mallocx.c mark.c mark\_rts.c misc.c new\_hblk.c obj\_map.c os\_dep.c ptr\_chck.c reclaim.c stubborn.c typd\_mlc.c win32\_threads.c.
*Hint: instead of using the “Existing item” dialog from the project, you can keep an explorer window open and drag in the files you want*.

I initally made the mistake of putting “gc\_cpp.cpp” in the project. This overrode the “new” operator and sent eveything through gc. It worked,
but was much slower (you could hear the hard drive grinding) (Edit:maybe it was the log file ?).

And add to the project the include directory “../libs/gc/include/” from the project properties (don’t forget my most hated feature) in c++/General/Additional Include Directory.

Now there are only a couple of errors. In builtin.c, comment out the “\_ftol2” function. Add the defines :GC\_NOT\_DLL;GC\_WIN32\_THREADS,
and add the “Linker/Input/Additional Dependencies” user32.lib. While you are there, add \_CRT\_SECURE\_NO\_DEPRECATE to the defines, and
4996 to the Advanced/”Disable Specific Warnings” for more reasonable output.

I now have a “Debug/neko-static.exe” that can be run. Not that it will do us much good, because it has no libraries, and crashes on:

class Test
   { public static function main() { neko.Lib.print("Hello static world.\n"); } }

because it finds the “std.ndll” from NEKOPATH. Because it is statically linked, it will not work properly with any extenal ndll files.
We can get around this with a simple trick. In “load.c”, instead of using

h = dlopen(val_string(pname),RTLD\_LAZY);

Use:

h = GetModuleHandle(0);

This is quite neat, because any “\_\_dllexport” functions will be accessable will be visible from the exe module.

Now the program just fails because there is no std library. Fair enough – just add one: Create in “Source Files” filters “libs” and “libs/std”, and
add all the .c files from libs/std. “neko.h” is not found, so add “vm” to the include path (DFMHF), and add “wsock32.lib” to dependencies. Also, comment out “_ftol2” from math.c.

Now build – hey presto a stand-alone neko exe!

One more trick – before adding the “.n” bootstrap onto the end, compress the exe using the rather satifying exe-packing program, [upx](http://upx.sourceforge.net/). You need to do this first, because the script will be read from the original file on disk, not the decompressed image in memory.

So you get:neko-static-upx.exe that you can use as a base. To build an exe, you can use the “nekotools.exe boot -b neko-static-upx.exe Test.n”. If neko has trouble finding the exe, place it in the $NEKO\_INSTALLPATH directory. This exe should run anything that uses only the “std” library (sadly not “regexp”).
There is one bug with this build, it generates “gc.log” files. I will have to track down the flag to disable this.
So witness my opus:

test.exe

*Note: Now, I’m no lawyer (as all good legal opinions start), but all the code here will be using the LGPL license (or more liberal). My understanding is that the spirit and letter of the law means that if you compile with LGPL code, you should give everyone the right to __RELINK__ your code with a different version of the LGPL code. Normally this is done with DLLs, since this is simple. In this case, it is being done with the “.n” file you are embedding. ie, there is no reason why someone could not relink your exe using the excact same procedure above. You do not need to give them your haxe source code, only your “.n”. However, it does mean you can’t do any tricky hidden DRM stuff in the exe, without surrendering the appropriate “.obj” file.*

“Harr”, I hear you say, “that is satisfying”. But wait, there’s more.
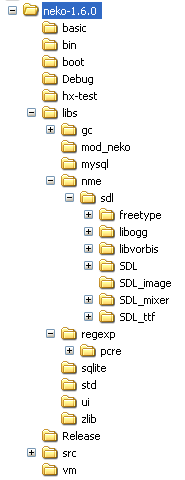
nekodirectories.png

Wouldn’t it be cool if you had a simple base you could use for all your gaming? Well, it can be done. To statically link against NME, you need to gird your loins and download the following packages:

– SDL-1.2.12.tar.gz
– SDL_mixer-1.2.8.tar.gz
– SDL_image-1.2.5.tar.gz
– SDL_ttf-2.0.9.tar.gz
– libogg-1.1.3.tar.gz
– libvorbis-1.0.0.tar.gz
– freetype-2.3.5.tar.gz
– pcre-7.4.tar.gz

I ran out of steam and just commented out the “sge” library bits, and stopped at ogg audio (untested) (sorry Lee).

If you are not interested in gaming , the regexp bit may still be appropriate.
I extracted the pcre library to libs/regexp and renamed it “pcre”, and the “hand configured” by

cp  pcre.h.generic  pcre.h
cp  config.h.generic  config.h
cp pcre_chartables.c.dist pcre_chartables.c

Added ‘#include “config.h’ to top of pcre.h and removed “HAVE\_DIRENT\_H” define. I then added the c files (skipping the example files that define a “main” function) as well as “libs/regexp/regexp.c” to the project in a sub-folder.

I copied the NME source files from the “project” folder of the “haxelib” version of NME. I then added some extensions for blink, and commented out the sge stuff because there are only so many libraries you can add in an evening.

I created an “sdl” directory in the NME directory (should have probably stuck it next to it) and extracted all the above libraries and renamed them without their version numbers. I then painfully selected source files from these libraries for the project. Some things to note:

– #define OGG\_MUSIC from the project properties.
– #define \_WIN32\_WINNT=0x400 to get TRACKMOUSEEVENT
– Added each of the packages somewhere in the include path, eg: libs/nme/sdl/SDL/include libs/nme/sdl/SDL\_image libs/nme/sdl/SDL\_mixer etc.
– Added SDK path the get ddraw.h (additional download required for VS express edition)
– #define FT2\_BUILD\_LIBRARY to say we are building it, not using it.
– When adding files from freefont, you only need to add one from each “driver”.
– I commented out the “GC_write” function to try to stop the log.

When compiling modules with “DEFINE\_ENTRY\_POINT”, you get a multiply defined symbols. So I commented these out (could probably have done something in the header), and added specific calls to these boot routines in vm/main.c.

There, if you are still awake, you have it. The final output is the base: neko-nme-upx.exe(615k) which will run the BlinkDemo “.n” files (and any standard program that uses “std” and “regexp”) without and additional help. And see the stand-alone programs:

robotdemo.exe (765k)

cardemo.exe (760k)

Plenty of stuff still to be done, such as “subsystem:windows”, more audio, sge etc, but
I think this is an excellent way to deliver games (or utilities for that matter), without fear of DLL hell. It also sidesteps “manifest hell” that microsoft seems keen on inflicting on us by insisting that the vc8 dynamic runtime is installed in a central location. I think the logic goes “if .net apps have to have a separate runtime installer, every one has to too”. What a stupid solution to force when the simple “just put the dll in the application directory” has worked for decades. (sorry about the rant).

It runs faster, too!

Cross-platform again

blinkdemo.png
So far, I’ve mostly looked at the flash/swf version but now I will return my attention to cross-platform development.

There are a number of existing libraries that can be used with haXe, but most of these are low level, but what I’m after is a higher level option. So the plan is to build a higher-level layer on top of an existing module. I have chosen to build on top of NME, which is SDL based. My decision was mainly to do with support for opengl, sound/music, font, input and screen management.

In the end, the design wrote itself, based on the simple rule “it should be easy to port something from existing flash code”. Initially I tried writing a substitute library called “flash”, but the haxe compiler rejected me. This is probably best, because, although the alternative requires slightly more porting for the flash case, I think it allows for greater possiblities of minor architectural changes. This has two big advantages – half the work is already done for me and there is an excellent design document for the rest.

The result is a library I have called “blink”. There is essentailly one blink class definition for each flash class. On the flash platform, a simple “typedef” is used to get exactly the same code as native flash. On the neko platform, there is a haxe implementation that ultimately falls through to an NME call.

The library is only at the demo stage, and only implements enough to get the APE demos off the ground, but I think is shows the possibility. The only changes required were to change “flash.” to “blink.”, modify the main-line boot function slightly and make sure to use cross-platform constructs (eg, no “__as__” casting).

The code here (BlinkDemo.zip) shows the same code compiled for flash and neko. It uses a slightly extended NME library, which is provided as a dll in the bin directory – to use the dll, make sure you run the neko.exe in the bin directory so it finds the right one.

The updated performace is (note:using “cast” not “as”):

Car Demo Robot Demo
Original 2.0ms 9.5ms
haXe 1.58ms 9.45ms
hx->as3 1.56ms 9.47ms
neko/nme 4.0ms 16.9ms

On first glance it would appear the numerical processing takes about twice as long under neko as it does under flash. However this code might not be the greatest test because we can see how the performance of the “cast” command can effect the results.

Also of note is that the graphics is quite capable of reaching 100fps, so I do not think the SDL code will be a bottleneck.

I am very pleased with this approach, and I think it might be the way forward for cross platform game development. In some ways (certain) games are easier because they use a generally smaller sub-set of graphics primitives – mostly image drawing.

Change a few lines, get a big speedup.

It was pointed out to me that there was a better way to do a “cast” and a few simple changes to to porting script yielded some big improvements. So, the new bundle [here](https://hughsando.com/wp-content/uploads/2007/11/apeport2-a045.zip) now gives:

Car Demo Robot Demo
Original 2.0ms 9.5ms
haXe 1.58ms 9.45ms
hx->as3 1.56ms 9.47ms

So now you can add speed as a reason to use haXe.

Porting APE (Actionscript Physics Engine) to haXe

I see that APE [http://www.cove.org/ape](http://www.cove.org/ape) has moved on to version 0.45 alpha, and has an extremely beautiful “robot” demo. So, with the faster version of haXe, and improved knowledge, I though it was time to try porting it again. This time, I took a different approach – I wrote a program to do the porting for me. This has a few advantages. It allows for easy porting of future versions. It provides a list of things required, and it allows for modifications (such as the FPS counter) to be done only once (to the as3 code) and ported automatically to the haXe code.

[The full project can be found here.](https://hughsando.com/wp-content/uploads/2007/11/apeport-a045.zip) It contains source, conversion program and demos.

The timings for the calculations are as follows:

Car Demo Robot Demo
Original 2.0ms 9.5ms
haXe 2.04ms 12.1ms
hx->as3 2.3ms 24.1ms

Which I think is pretty good – except for the last entry – not sure what happened there.
Note that the haXe speed required a hack to avoid the “as” and “is” cast/query operators – and used a virtual function to achieve the same result in a neat way.

The conversion program is not a complex parser, rather a bunch of regular-expressions that relied on coding style as much as syntax. However, it worked pretty well in the end, once I got the “properties” sorted out – APE uses these quite a bit – and you must have “strong” types to use them in haXe. This program may be reusable to a small extent, but it pretty much tied to APE.

An outline of the porting tasks is as follows:

– Convert “int”, “void”, “Number” etc.
– Convert “package xxx {” to “package xxx;”.
– Expand out “import xxx.*” imports.
– Remove “private”, “final”, “internal” etc.
– Scan the class for “get” and “set” functions and insert “var prop(get_,set_):type” where appropriate. This was complicated by the fact that some of these were “override” properties and should not have this extra insertion. (I should have looked for the “override” keyword to make this easier).
– Add return statements to set functions.
– Fix POSITIVE_INFINITY.
– Make sure arrays are strongly typed – need this for properties.
– Change in-line array declarations when array is not of type Dynamic.
– Convert “indexOf” function in array.
– Convert “for(a ;b ;c )” to “a; while(b) { … c }”.
– Fix scoping of variables resulting from variables declared inside for statements.
– Add semi-columns to lines that needed them.
– Change constructors to “new”.
– Add static main function to main class, and “addChild” it.
– Call “super()” where required.
– Convert default-arguments to optional-arguments.
– Remove “break” from switch statements.
– Change “is” and “as” operators.

AS3 and haXe are reasonably close and with a consistent coding style, I think the automatic porting is a very viable option. If I had control over both sources, I would have done a few little things to the AS3 to make it slightly easier – ensure “;” on all lines, explicit call to super(), don’t double up on variable names inside for loops and other minor stuff. But the reg-ex engine makes most of these things pretty easy to work around.

Huge speedups for flash9 with haXe 1.15, hxasm investigated.

Due to the great work of Nicolas Cannasse, most of the results below have to be re-written! HaXe now as stong typing in flash9, significantly improving performance. I also have a new machine, so some of the results will not be directly comparable, but you will get the idea. I have also added a new one: inline-grid-while, that uses while loops instead of for loops.

With the new version of haXe comes some very interestesting technology – hxasm. This allows you to use haXe syntax to write flash9 “bytecode”. This gives the possibility of decoupling the “per object” bit of the grid iteration from the looping bit by concatenating chunks of bytecode. In theory, you should be able to achieve optimal performance using this method, since you can write any bytecode you like. However, currently I can’t quite get the performance I think because ultimately the function is called through a “dynamic” interface, rather than a strongly typed one.

Writing hxasm from scratch can be quite difficult. For starters, the flash api requires time to compile the code, so the api involves a callback to complete the compilation. Also, the haXe syntax is not that of a “proper” assembler, so jumps etc take a bit of work. And sometimes it is a bit hard to know where to start. To help with this, I’ve written a tool that takes compiled hx code, via the output of “abcdump”, and converts it to hxasm. You can find this code in abctools.zip.

Examining the hxasm code, you can see the difference between the for and while loops. Interestingly, other “hand optimisations” did not seem to give much better results – I suspect the flash vm is doing some pretty good optimisation as it goes. So I think the way to optimise is probably to change the original hx code, rather than the hxasm code (eg, using while loops instead of for loops). Another optimisation I looked at was to “burn in” runtime values. So rather than using the op code to get a member variable, you can burn this variable in as a constant into the bytecode. I think this gave a small improvement – I could not really tell. Infact, this last optimisation is really the only performace increment to be gained from runtime compilation – the rest could in theory be done in the production of the swf file. However, it does present a very interesting solution the the code decoupling!

The source code can be found in src2.zip. Unfortunately, this breaks the ability to compile for neko. Also, it requires a small mod to hxasm 1.03, using an additional offset of -4 on the “backwardJump” call in Context.hx.

Method Time (ms/frame) Pros Cons
Object List 8.1 Easy to understand/debug. Slowest. Causes stutter while garbage collection runs
HaXe Iterator 10.1 Improved performace over Object List.
Direct “drop in” replacement for Object List.
Decoupled data.
Slightly complex to write. Slightly slower than most.
While Iterator 7.1 Slightly faster than for-iterator. Slightly easier to write Slightly more complex to use.
Closure/Callback 13.9 Slightly faster than for-iterator. Decoupled. Interesting way of writing code. Interesting way of writing code.
Member Callback 6.0 Faster than anonymous callback. Member function name is explicit in code.
Inline GOB 6.4 Faster. Couples GOB code to grid implementation. Requires separate code for each function
Inline Grid – for 4.5 Fast. Easy to understand/debug. Not as badly coupled as Inline GOB. Couples Grid code to GOB implementation. Requires separate code for each function
Inline Grid – while 4.0 Fastest. Same as “for” loop, but slightly faster, and slightly more verbose. Couples Grid code to GOB implementation. Requires separate code for each function
HxASM inline code 5.1 Fast and decoupled. Requires writing “raw” hxasm callback. 2-phase setup

Out of all this, the conclusion is pretty similar – the tighter coupling creates faster code – but all the code is faster now, which is great. The inline hxasm is very interesting, and while probably not appropriate for this application, shows some promise for certain applications.

Iteration/looping

The following discussion is based on the source code :1000OgresOource.zip. This code uses the “xinf” haxelib module to provide support for cross platform (browser, downloadable) structures.

The Ogre demo uses a grid to check for collisions between objects. So,rather than checking 1000 sprites against 1000 others, requiring 1000000 checks per frame, each sprite only checks sprites in the local viscinity, running much faster. The 2D grid is independent of the tile grid, and its spacing can be optimised based on object size and density etc.

The code deals, in part, with “GOB”s (Game OBjects) and the GOBGrid. I tried to decouple the grid from the objects, but I could not, because the haXe template system is not powerful enough. The coding issue I’m going to talk about here is how to best separate the task of examining objects in the local visinity, from how the objects are stored in the grid. In other words, iterators.

The algorithm I’m going to talk about is something like the following pseudo code fragment:

GOB::Move()
{
   x += velocity_x
   y += velocity_y

   for_all_nearby_objects_in_grid
     if (obj_is_close_to_me)
        -> dont move.

The question is, what does the “for\_all\_nearby\_objects\_in\_grid” look like. I have tried the following:

Object List. Here, the GOBGrid produces an Array of candidate objects. The GOB then iterates over these, checking distances between the potential move position and these candidate objects. An important point to note is that the following:

   var objs = mGrid.GetCloseObjs(x,y);
   for(obj in objs)
      ...

was *much* slower than:

   var objs = mGrid.GetCloseObjs(x,y);
   for(i in 0...objs.length)
   {
      var obj = objs[i];
      ...

this should be considered when writing high-performance code.

HaXe Iterator. Writing the iterator was slightly tricky, because you need to think in a slightly different way than you would normally. Here I have made the assumption that “getNext” will be called exactly once after each successful “hasNext” call. I’m pretty sure this is right. This assumption places all the logic in “hasNext” and makes “getNext” trivial. The big advantage of the iterator is that it is syntactically identical to the object list code above (first example), eg:

   var objs = mGrid.GetCloseObjs(x,y);
   for(obj in objs)
      ...

and runs much faster. This leaves open the possibility of staring with a list and then moving to an iterator if the performace is required. The iterator code looks like this:

class GOBIterator
{
   var mGrid:GOBsList;
   var mGridPos:Int;
   var mGridEnd : Int;
   var mYStep:Int;
   var mWidth:Int;

   var mCurrentList : GOBs;
   var mListPos : Int;
   var mX:Int;

   var mNext : GOB;

   public function new(inGrid:GOBsList,
            inX0:Int,inY0:Int, inX1:Int,inY1:Int, inWidth:Int)
   {
      mGrid = inGrid;
      mWidth = inX1-inX0;
      mYStep = inWidth - mWidth + 1;
      mX = 0;
      mGridPos = inY0*inWidth + inX0;
      mGridEnd = (inY1-1)*inWidth + inX1;
      mCurrentList = mGrid[mGridPos];
      mListPos = 0;
   }

   // Haxe iterator interface
   public function hasNext()
   {
      if (mGridPos >= mGridEnd)
         return false;

      while(true)
      {
         if (mListPos=mGridEnd)
               return false;
         }
         else
         {
            mGridPos++;
         }
         mCurrentList = mGrid[mGridPos];
         mListPos = 0;
      }
      return false;
   }

   public function next() : GOB
   {
      return mNext;
   }

}

The mGrid is an Array of cells, each of which is an array of GOBs that are centred in that cell. To go from (x,y) coordinate to cell, the x and y are first quantised and then an index is calculated using cell=y*xcells + x. Another possiblity would be to have a 2D array of cells. I have not tried this, and it may be better or worse, I don’t know.

HaXe while loop. This is very similar to the above code, except that the getNext and hasNext code are combined, and return “null” at the end. The code is simiar- it uses the same constuctor and the function:

   // This combines hasNext with next, and returns null when done.
   public function getNext() : GOB
   {
      if (mGridPos >= mGridEnd)
         return null;

      while(true)
      {
         //var n = mWidth + mYStep - 1;
         //trace( "[" + (mGridPos%n) + "," + Math.floor( mGridPos/n ) + "]" );
         if (mListPos=mGridEnd)
               return null;
         }
         else
         {
            mGridPos++;
         }
         mCurrentList = mGrid[mGridPos];
         mListPos = 0;
      }
      return null;
   }

The problem with this is that you have to use the “while” loop, rather than the “for”, taking 3 lines instead of 1.

Closure/Callback. This method keeps the grid and GOB decoupled by asking the grid to iterate over the neadby objects, calling a callback function for each candidate object.

      var self = this;

      return mGrid.VisitCloseClosure( mMoveX, mMoveY, m2Rad,
                 function(inObj:GOB)
                 {
                    var obj:GOB = inObj;
                    if (obj==self) return true;

                    var dx = self.mMoveX-obj.mX;
                    var dy = self.mMoveY-obj.mY;
                    return dx*dx+dy*dy >= 2;
                 } );

This type of inline-function definition is just the sort of thing I’ve been craving in C++ for years. It takes a bit to get your brain around, but it does provide a very elegant way of decoupling code.

The above 4 methods are attractive because there is a large decoupling between the grid and the objects it stores. The grid could quite easily deal simply with dynamic objects, and the GOB need only know that the grid returns some kind of logical list. Unfortunately, they are not the fastest methods. The following methods introduce tighter coupling between the grid and the GOB in order to improve speed.

Visitor Callback. This method is very similar the the callback method above, except that the grid is passed an object of known type and calls a particular member function on it, rather than a anonymous function, for each candidate object. The problem is that this can only call one particular function, and thus can’t be adapted to a different function.

Inline GOB. This method, the GOB knows everything about the grid implementation and iterates over the elements directly. While it is not *too* much code in this case, this may soon grow unweildly if we consider such things as multi-resolution grids. This does not allow us the change the grid implementation without changing the GOB code too.

Inline Grid. Here the grid knows about GOB collisions and interrogates the objects directly. This binds part of the GOB implementation to the Grid and is also specialised for one particular function (eg, “collision detection”). However, it does let us change the grid implementation without changing the GOB code.

Results

The results are summarised in the following table.

Method Time (ms/frame) Pros Cons
Object List 31.8 Easy to understand/debug. Slowest. Causes stutter while garbage collection runs
HaXe Iterator 21.0 Improved performace over Object List.
Direct “drop in” replacement for Object List.
Decoupled data.
Slightly complex to write. Slightly slower than most.
While Iterator 20.0 Slightly faster than for-iterator. Slightly easier to write Slightly more complex to use.
Closure/Callback 20.7 Slightly faster than for-iterator. Decoupled. Interesting way of writing code. Interesting way of writing code.
Member Callback 16.4 Faster than anonymous callback. Member function name is explicit in code.
Inline GOB 17.6 Faster. Couples GOB code to grid implementation. Requires separate code for each function
Inline Grid 14.8 Fastest. Easy to understand/debug. Not as badly coupled as Inline GOB. Couples Grid code to GOB implementation. Requires separate code for each function

So, there you have it. *No definitive answers!*. Decoupling is sacraficed for performance in most cases. Except perhaps that the grid should loop over the objects, rather than the other way around. I think I will use the Inline Grid method for collision detection.

However, if I need to write code like “All ogres run away from all skeletons” then I will need one of the first 4 generic ways of iterating. The iterator methods may get too complex if I have “multi-resolution” grids, in which case, the anonymous function callback may be the way to go. There may also be a way to bring the anonymous function performace up to match the member-function performace – this would be the best of all worlds (fully customisable, and only slightly slower than Inline Grid). Any ideas anyone?

You can download the code and comment/uncomment these various options in GOB.hx.

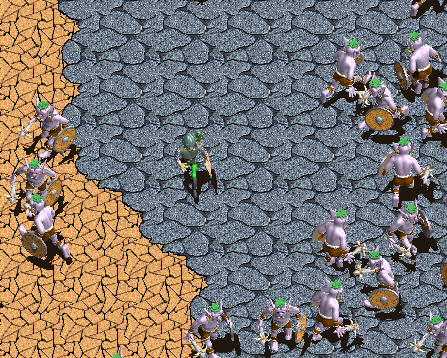
Ogre Sprite Demo

ogredemo.PNG

Well, it’s been a while since I’ve written anything – too many projects. I have been looking at doing a 2D game using flash9/neko and have produced a small demo. You can see it action on this page,
and you can download the windows version here.

Looks like things could work out well!